Disclaimer: For this review the publisher has provided me with a free license of the software. However, this is not sponsored content or an infomercial, but my honest, personal opinion of the product.
This is the second instalment in my series of reviews of Franzis’ projects suite of post-processing software. As with BLACK & WHITE projects 4 I first studied the short handbook (20 pages, can be downloaded from the Franzis website) and watched a couple of instructional videos on Youtube before I tried my hand on the software. Again, this review is based on the version for Mac OS.
Key features
Stacking of up to 500 focal planes
Advanced stacking options
42 image styles (filters)
Integrated RAW development module and post-processing
Adobe Lightroom and Photoshop plugin
Mac and Windows
Supports a wide range of file formats, including proprietary RAW
Workflow and functionality
Belonging to the same suite of editing software, the interface and workflow are remarkably similar to that of Black & White projects 4, which I have reviewed earlier, thus I will only give a brief overview here and highlight the differences.
When opening Focus projects we are greeted with a rather empty interface and a couple of options allowing us to load images into the program or open past projects. The sensible option is to load images, and here I was pleasantly surprised at the wide variety of file formats accepted, including propriety RAWs of even lesser known manufacturers. Up to 500 images can be selected at the same time (I cannot imagine what that would do to my laptop though), and once you have opened some a screen appears that lets you choose whether you would like the images to have a new white balance, noise reduction or exposure optimisation applied, whether you would like to have them aligned or change the colour space, and which level of precision you are after for the actual stacking (the higher the accuracy, the longer the processing time). Once you have made your choices the software starts its calculations, and after a bit spits out the stacked image. Simultaneously a range of editing options appear. On the left hand site we have a menu that includes 42 different image styles, from ‘natural neutral’ which is automatically selected, to black and white conversions and rather extreme, Instagram like filters. The menu on the right offers an editing menu called ‘Expert’ which is subdivided into a ‘Finalise’ and an ‘Expert’ section. The two offer varying levels of control over the final image, with the former being easier to use and the latter being much more exhaustive. ‘Finalise’ offers simple sliders to adjust noise reduction, tonal values, clarity, dynamic, sharpness, colour toning and sensor corrections. There is also a ‘web presentation’ mode that helps in generating a video that illustrates the process of focus stacking.

Meanwhile, the expert mode contains so-called ‘post-processing filters’, which are not the kind of Instagram crime you may associate with the term, but rather your standard editing options, like sharpening, noise reduction, curves, vignetting, contrast etc., but also more exotic options such as ‘intense radiance’ or ‘3D depth fog’. The beauty of the expert mode is that for each setting not only the strength and opacity can be chosen, but they can also be masked via their individual curves in order to only affect shadows, highlights or mid-tones or areas of low or high contrast. The curves are displayed above a real-time preview, showing which parts of the image will be affected to which extent. I had a quick look at the post-processing, which I have already covered in my my earlier review of Black & White projects 4, and am surprised and happy to report that it works much faster in Focus projects, with changes being applied almost instantaneously.
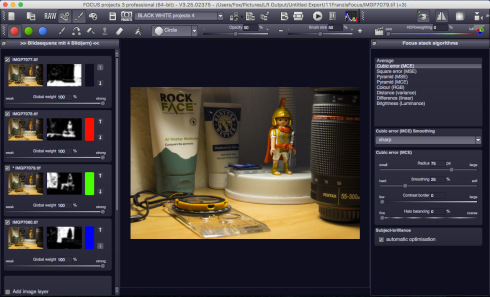
In addition to general editing via the RAW and post-processing modes there exists a comprehensive set of tools that influence the focus stacking itself. A variety of stacking algorithms are available, and via trial-and-error the one that suits the specific image best can be found. The impact of each individual frame on the final result can be altered via weightings, and the whole process is made easier by a thumbnail displayed next to every image in the stack which in black and white shows the specific areas the final image draws upon. In the same vein a map can be activated that shows the individual impact of up to four images of the sequence on the final result via a colourful overlay which can be further manipulated. It is possible to selectively reduce or increase the contribution of a specific area of a specific image by choosing the associated colour and brushing over the area in question.

Once the image has been edited to taste it is ready for export. Unfortunately I have not found an option that allows for altering the resolution to reduce the file size and make images suitable for publishing on the internet, so I had to resort to exporting as a 16-bit TIFF, opening the image in an additional editor, then export at reduced resolution. It would be nice to see Franzis implement this feature some time. The same applies to an ‘Undo’ option, which Focus projects again lacks. It is possible to manually set restore points, but the manual explicitly mentions that these take up a lot of hard disk space and should be used in moderation. But while this seriously hampered my workflow in Black & White projects 4, I hardly noticed it in Focus projects, mostly because many options are inherently reversible and I never found myself needing to take a step back.
Performance
Most important, of course, is how well the software fares at accurately stacking exposures with different focal points in order to achieve an extended depth of field. In order to test this, I threw four test scenes at it. One relatively straightforward image of objects on my desk, one scene of branches I photographed out of my window, a landscape shot taken in the Scottish highlands, and a handheld shot taken in a staircase. All images had received varying amounts of editing beforehand to ensure decent sharpness and correct for distortion, and were exported in full resolution as uncompressed 16-bit TIFF files. All parameters in Focus projects were set to achieve maximum accuracy and quality at the expense of processing time, which I was not concerned about, and further enhancements such as noise reduction and exposure optimisation were switched off.
Test scene
The following test scene consists of varying objects on my desk. It was shot with my K3 and the Sigma 17-50 f/2.8 HSM at f/3.5, 1/80 sec., ISO 200. The camera was mounted on a stable aluminium tripod, however the floor in my room is carpet which does not exactly benefit pixel-level precision. I took four images, with the focal points being on the closer edge of the compass housing, the close surface of the lamp’s stand, the close edge of the stack of SD cards and the logo on the moisturiser tub in the background, furthest away from the camera. Minor adjustments were made in Adobe Lightroom, especially some sharpening was applied, the exposure was raised slightly and the white balance was normalised to achieve a more neutral tone.
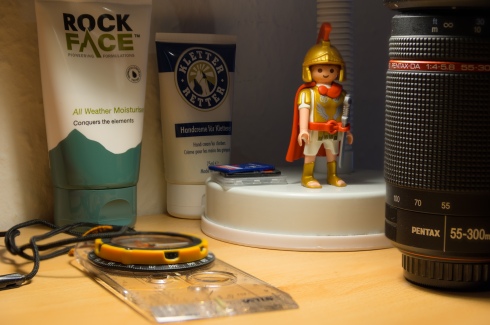
The result of Focus project’s stacking is indeed very good. It took about 20 sec. to align and stack four TIFF files of about 145 MB each, which I would consider quite speedy. All exposures are perfectly aligned and the software has managed to identify all focal points, with every object I focused on being tack sharp. There are out-of-focus areas in between the four planes of sharpness, but that is my fault as I chose focal points with too much space in between for the large aperture I selected. Overall Focus projects did a great job at this one. Comparing the result in 100% view with the single images I noticed that the Focus projects image appeared exhibited a weird, almost oil painting like texture that had destroyed some detail, but quickly found that this was the result of a post-processing sharpening filter that is active by default. Switching it off and exporting the image again, I could not see any difference any more, except for the expanded depth of field, of course.
Branches
For my next test I moved the tripod to the window and mounted the Pentax HD DA 55-300 WR. At f/5.8, 1/125 sec. and ISO 800 at 300 mm (APS-C), I focused on different points in the clutter of branches and twigs, and finally the facade of the building in the background. Overall I took four exposures. This time the result is not quite as good. Focus projects has clearly identified all focal points, but only integrated certain areas of each focal plane. We can clearly see that some areas of the facade in the background are sharp, whereas others are completely blurry. It was slightly windy and the branches have visibly moved to a certain extent between exposures. Thus I cannot really blame it on Focus projects – my bad. At the same time this offered me the opportunity to try out the options that allow for fine-tuning of the focus stacking, so I went into the weightings and, using the brush, painted in more of the background layer around the branches. The result did indeed improve noticeably, but without an option to select specific areas and mask them, working one’s way all around the many branches in the image was also cumbersome. But I can see how this tool would be very useful for more straightforward images.

Handheld
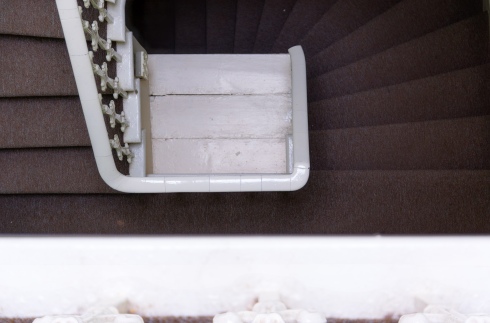
Focus projects is clearly meant to be used with images shot from a stable tripod, but the software contains an option that aligns images to compensate for some amount of movement. In order to test the limits of this, I took a couple of handheld photos, deliberately varying the composition a bit. The following image consists of two original frames, shot at f/2.8, 1/30 sec., ISO 400, one focused on the detail at the lower edge, one on the platform in the centre of the image. Again, Focus projects did a good job, and the lower edge being blurry is due to a too shallow depth of field for both exposures.
Landscape
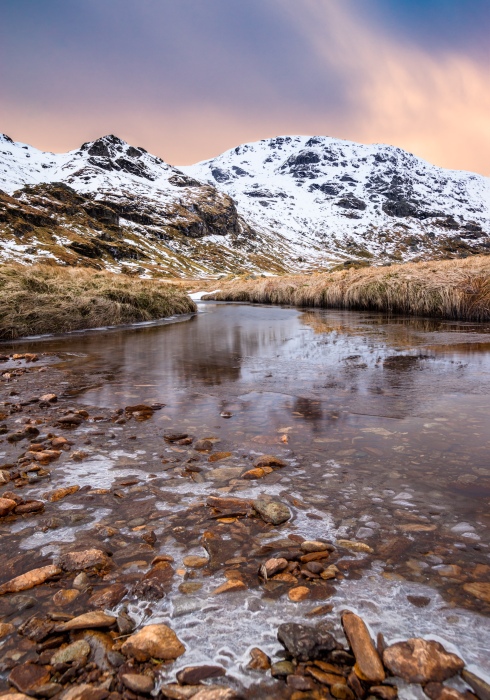
The applications Focus projects is specifically advertised for include nature macro photography, product photography, still life, architectural and interior photography and microscope photography. There is no mention of landscape photography, even though this field frequently requires the merging of exposures that were focused on different areas. Images shot with ultra-wide angle lenses that include foreground details close to the camera are usually impossible to capture in one exposure, the solution is to combine two (or sometimes three) images, one focused on the foreground close to the camera, another focused either to infinity or according to hyperfocal distance estimates. So far I have simply merged these exposures through layer masks and gradients in GIMP or Affinity Photo, but with a dedicated focus merge software at hand, naturally I decided to give it a shot. The image below was taken about two weeks ago in the highlands close to Loch Lomond, the first shot was focused at the rocks and ice in the foreground, in the second one the focus was on the snow-covered mountains. Both frames were taken at f/8, 20 sec., ISO 100 at 17 mm (APS-C).
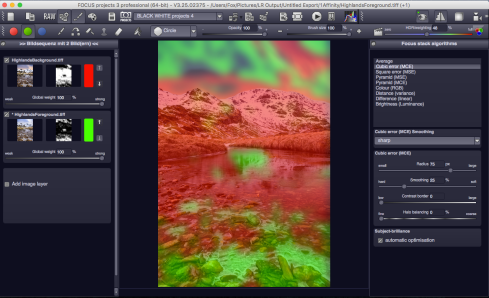
This time Focus projects struggled to select the proper portions of each image, instead picking various bits of each image almost at random. The weighting map shows a colourful mosaic, but using the brush tool I quickly solved the problem, assigning the rocks in the foreground to the foreground image, and the water, grass, mountains and sky to the background. The result is a well stacked image with a sharp fore- and background.
Conclusion
When I tested Black & White projects 4 a couple of months ago, my impressions were not enthusiastic, but rather what in German we would call ‘hesitantly positive’. I liked the results I got, but was seriously annoyed by the software’s endless processing times, the lack of an ‘Undo’ option and a couple of other drawbacks. I am happy to report that my impressions of Focus projects 3 are very different in that I found very little to complain about. Not only does the actual focus stacking work like a breeze, but the post-processing, which was more than sluggish in Black & White projects, is much faster too. The stacking itself is both highly accurate and fast, and the additional options offer a high level of control over the final result. It can happen that the software does not perfectly stack an image at first try, but with the help of brushes it is easy to rectify such mistakes. Again the Restore points are a rather cumbersome alternative to an ‘Undo’ option, but I did not find myself needing one once, as many options are inherently reversible. Overall the software does exactly what it promises accurately and quickly. The MSRP of €129/US$125 is certainly steep, too steep in my opinion for such a specialised software. Personally, I would not spend that kind of money on Focus projects, but I also do not regularly require focus stacking. If you work in product photography or frequently shoot macros, you may well be able to justify this purchase. It is also important to note that Franzis frequently offers huge discounts on some of their software packages, so it might be a good choice to wait for a bit and keep an eye open for one of those.
Pros
Excellent results for static scenes
Can deal with somewhat divergent framing
Speedy processing
Good level of control over how images are stacked
Advanced RAW processing integrated
Lightroom and Photoshop plugins for continuous workflow
Cons
No resize option upon export
Restore points need to be set manually
Settings made in RAW processor cannot be changed after having been applied
Steep price
Franzis Focus projects 3 is available for €129/US$125 from the publisher’s website, or €98 on Amazon Germany. There are versions for Microsoft Windows and Mac OS, and a trial is available for those who do not like to buy a pig in a poke.


Thanks for this good work. I bought the software after seeing it available at £35 on Pentax User – couldn’t let it go by at that price! I do macro, some product work and architecture and I’m looking forward to using this…
Have you thought of posting this on Pentax Forums…since you are using Pentax like me?
LikeLike
Thanks for your kind comment Richard. I don’t really promote my blog on forums just for the sake of it, just occasionally drop a link to some posts that are relevant to the respective thread (e.g. if someone on PF asked about this program, I’d refer to my test) 😉
LikeLike
Thanks for the comprehensive review. I have one question: does FOCUS projects 3 accept DNG format images? I saw that there is a “RAW” button in one of the screens, but the manual says that images from Lightroom intended for stacking must be exported in 16-bit TIFF, so it’s not quite clear whether DNG images would work too. Thanks
LikeLike
I don’t have FOCUS projects installed anymore, because I don’t really do stacking, so I cannot try it out for you. But I am pretty sure it supports DNG, if you import it directly. If you want to pass it on from LR, I doubt it will offer RAW support. For example, I cannot pass any file on to Affinity Photo or the Nik collection from Lightroom in any kind of RAW format – it’s only TIFF, PSD or JPEG.
LikeLike